IB DP Biology: HL復(fù)習(xí)筆記1.1.6 Skills: Cell Theory

Practical 1: Using a Microscope
- Many biological structures are too small to be seen by the naked eye
- Optical (light) microscopes are an invaluable tool for scientists as they allow for tissues, cells and organelles to be seen and studied
- For example, the movement of chromosomes during mitosis can be observed using a microscope
How optical (light) microscopes work
- Light is directed through the thin layer of biological material that is supported on a glass slide
- This light is focused through several lenses so that an image is visible through the eyepiece
- The magnifying power of the microscope can be increased by rotating the higher power objective lens into place
Apparatus
- The key components of an optical (light) microscope are:
- The eyepiece lens
- The objective lenses
- The stage
- The light source
- The coarse and fine focus
- Other tools used:
- Forceps
- Scissors
- Scalpel
- Coverslip
- Slides
- Pipette
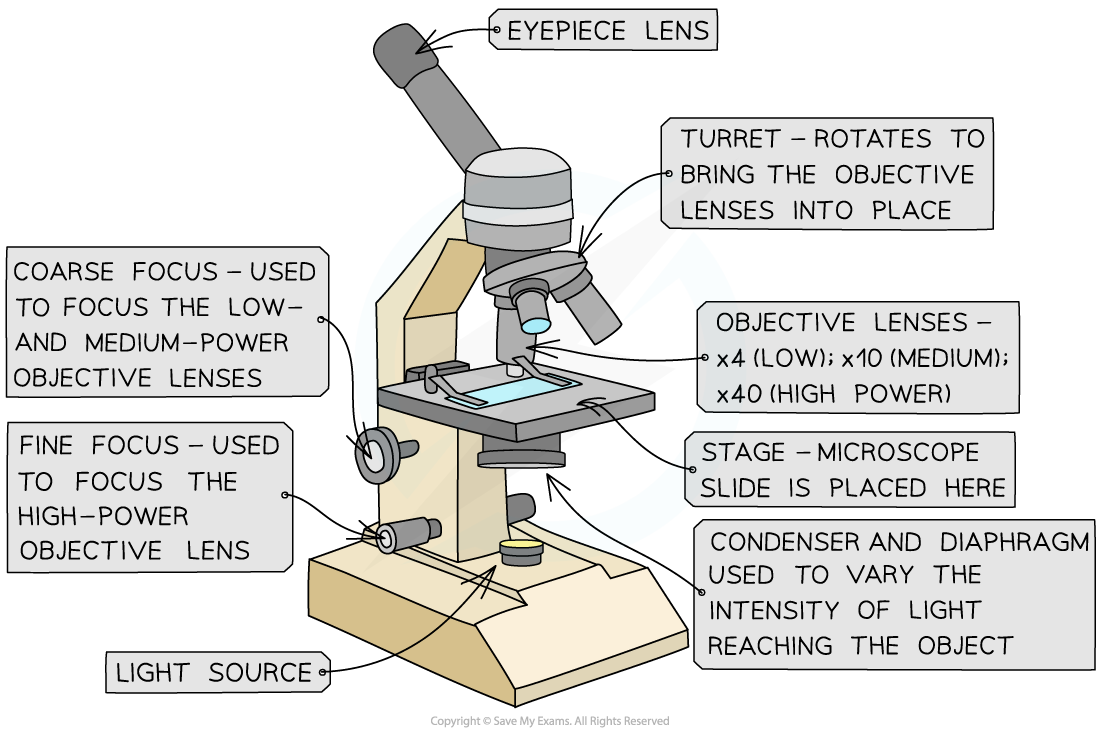
Image showing all the components of an optical (light) microscope
Method
- Preparing a slide using a?liquid specimen:
- Add a few drops of the sample to the slide using a pipette
- Cover the liquid/smear with a coverslip and gently press down to?remove air bubbles
- Wear gloves?to ensure there is no cross-contamination of foreign cells
- Preparing a slide using a?solid specimen:
- Use scissors to cut a small sample of the tissue
- Peel away or cut a?very thin layer?of cells from the tissue sample to be placed on the slide (using a scalpel or forceps)
- Some tissue samples need be treated with chemicals to kill/make the tissue rigid
- A?stain?may be required to make the structures visible depending on the type of tissue being examined
- Gently place a coverslip on top and press down to remove any air bubbles
- Take care when using sharp objects and wear gloves to prevent the stain from dying your skin
- Place the microscope slide on the?stage, fix in place using the stage clips (ensure the microscope is plugged in and on)
- When using an optical microscope always?start with the low power objective lens:
- It is?easier to find?what you are looking for in the field of view
- This helps to?prevent damage?to the lens or coverslip incase the stage has been raised too high
- Whilst looking through the?eyepiece lens?move the?coarse focusing knob?until the specimen comes into?focus. The?fine focusing knob?should be used to sharpen the focus on particular parts (and at higher objective lens only)
- To examine the whole slide move it carefully with your hands (or if using a binocular microscope use the stage adjusting knobs)
- Once?you have?focused?on the object/structure then carefully?move?to?higher objective lens?(10X and 40X). If resistance is felt do not continue to move the turret. At the?higher objective?powers?only?use the?fine focusing knob
- Do not?move?the?stage down?when moving to higher objective lens
- Unclear or blurry images:
- Switch to the lower power objective lens and try using the?coarse focus?to get a clearer image
- Consider whether the specimen sample is?thin enough?for light to pass through to see the structures clearly
- There could be?cross-contamination?with foreign cells or bodies
- Use a?calibrated?graticule to take measurements of cells
- A?graticule?is a small disc that has an engraved?scale.?It can be placed into the eyepiece of a microscope to act as a ruler in the field of view
- As a graticule has no fixed units it must be?calibrated?for the objective lens that is in use. This is done by using a scale engraved on a microscope slide (a stage micrometer)
- By using the two scales together the number of micrometers each graticule unit is worth can be worked out
- After this is known the graticule can be used as a?ruler?in the field of view
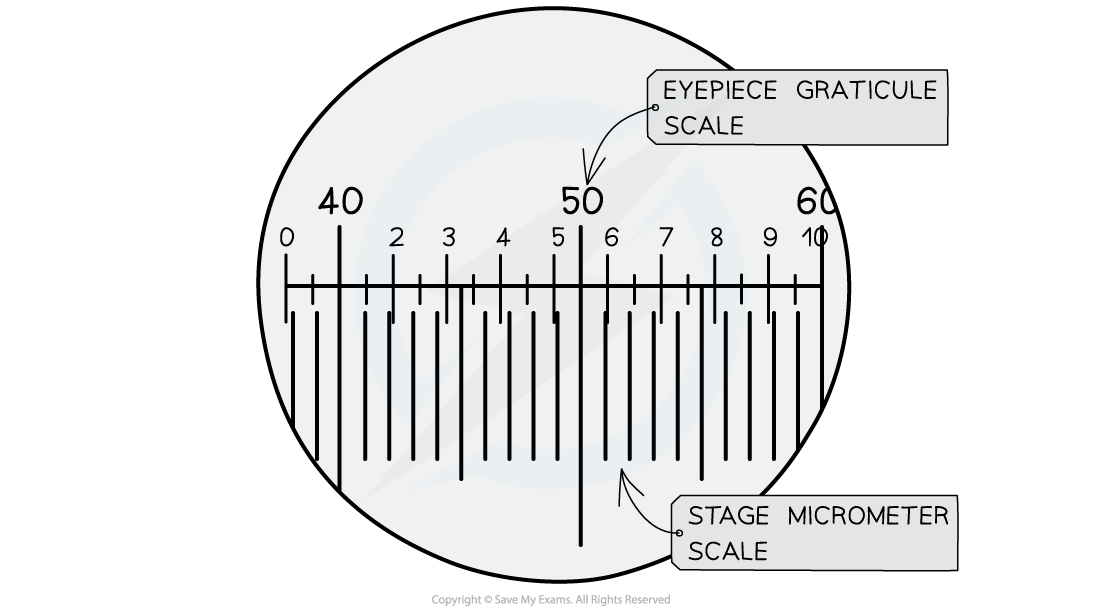
The stage micrometer scale is used to find out how many micrometers each graticule unit represents
Drawing cells
- To record the observations seen under the microscope (or from photomicrographs taken) a labelled biological drawing is often made
- Biological drawings?are line pictures which show specific features that have been observed when the specimen was viewed
- There are a number of rules/conventions that are followed when making a biological drawing
Guidelines for microscope drawings
-
- The drawing must have a title
- The?magnification?under which the observations shown by the drawing are made must be recorded
- A?sharp HB pencil?should be used (and a good eraser!)
- Drawings should be on plain white paper
- Lines should be?clear,?single?lines?(no thick shading)
- No shading
- The drawing should take up as much of the space on the page as possible
- Well-defined structures should be drawn
- The drawing should be made with?proper proportions
- Label lines?should not cross or have arrowheads and should?connect directly?to the part of the drawing being labelled
- Label lines should be kept to one side of the drawing (in parallel to the top of the page) and drawn with a?rulerThe conventions are:
- Drawings of cells are typically made when visualising cells at a higher magnification power, whereas plan drawings are typically made of tissues viewed under lower magnifications (individual cells are never drawn in a plan diagram)
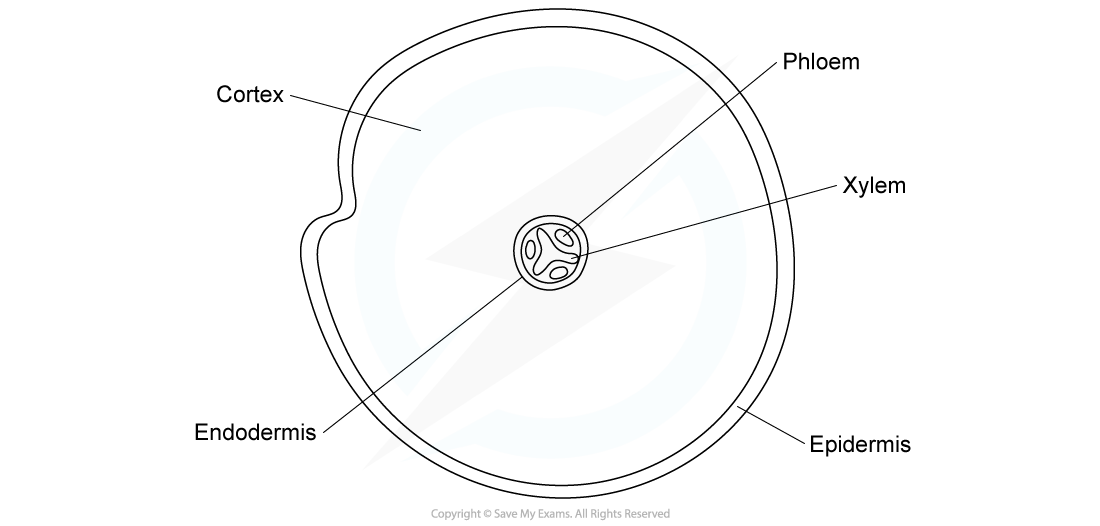
An example of a tissue plan drawn from a low-power image of a transverse section of a root. There is no cell detail present.
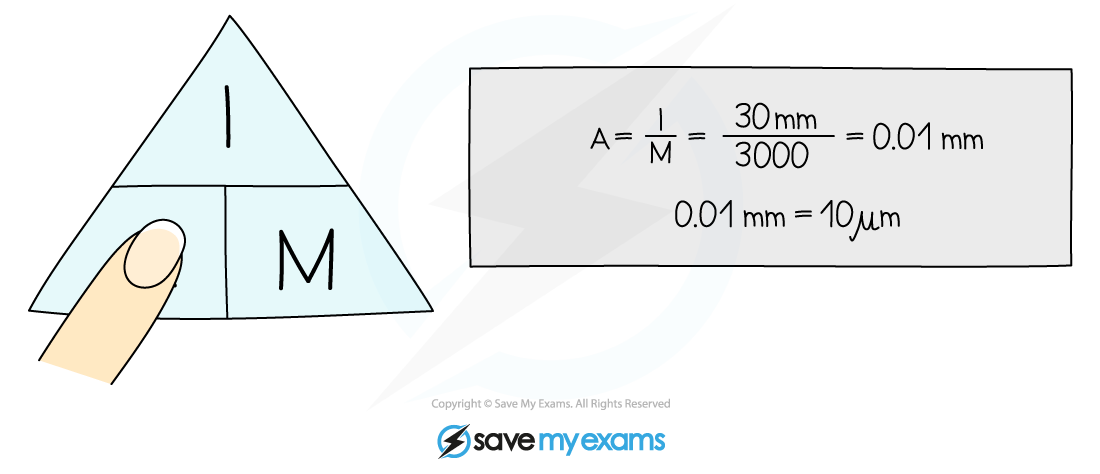
Magnification calculations
- Magnification?is?how many times bigger?the image of a specimen observed is in comparison to the actual (real-life) size of the specimen
- The?magnification?(M) of an object can be calculated if both the size of the image (I), and the actual size of the specimen (A), is known
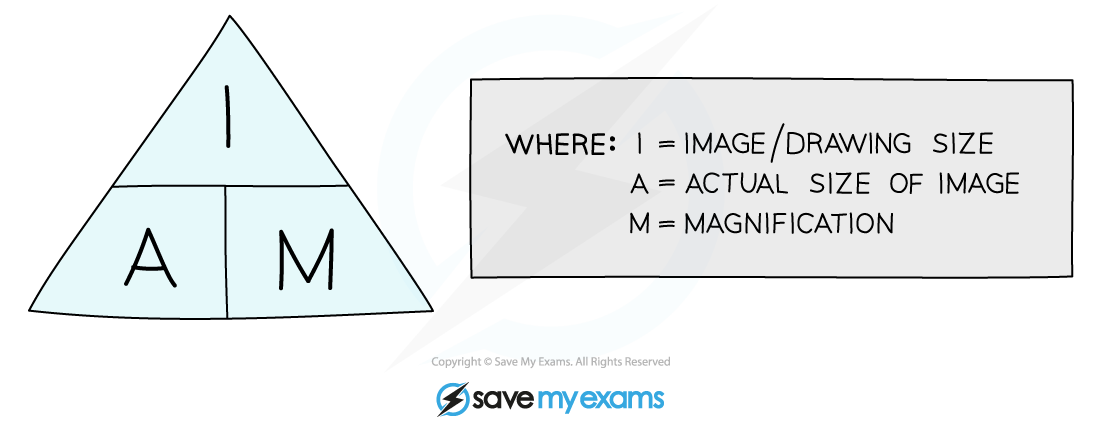
An equation triangle for calculating magnification
Worked Example
An?image?of an animal cell is 30 mm in size and it has been?magnified?by a factor of X 3000.What is the?actual size of the cell?
To find the?actual?size of the cell:
Using the appropriate units
- The size of cells is typically measured using the?micrometre?(μm) scale, with cellular structures measured in either?micrometers?(μm) or?nanometers?(nm)
- When doing calculations all measurements must be in the?same units. It is best to use the?smallest unit?of measurement shown in the question
- To convert units, multiply or divide depending if the units are?increasing or decreasing
- Magnification does?not have units
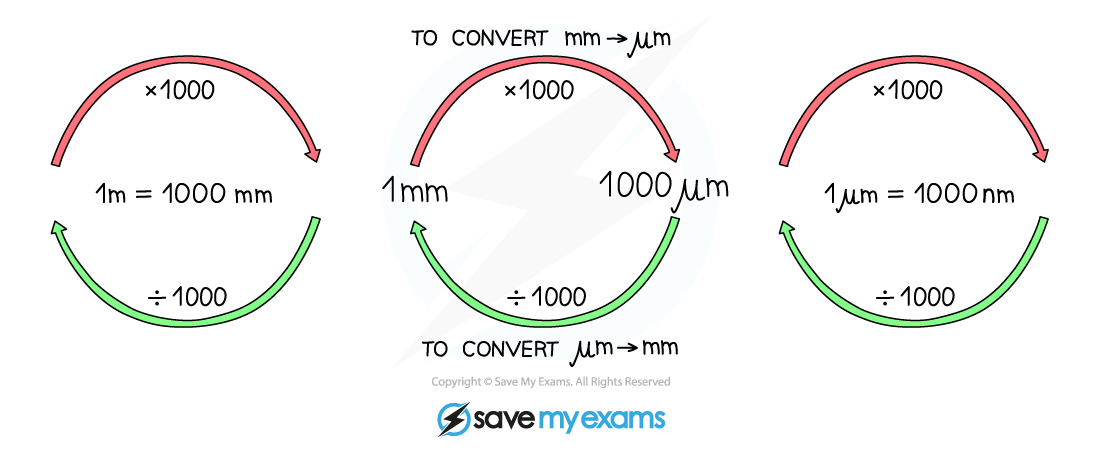
- There are 1000 nanometers (nm) in a micrometre (μm)
- There are 1000 micrometres (μm) in a millimetre (mm)
- There are 1000 millimetres (mm) in a metre (m)
Using a scale bar
- A scale bar is a straight line on the drawing or micrograph that represents the actual size before the image was enlarged
-
- Use a ruler to measure the length of the scale bar in millimetres
- Convert this measurement into the same units as the number on the scale bar
- Insert these numbers into the magnification formula above (note: the size of the image is the measured length of the scale bar and the actual size is the number on the scale bar)If the calculation required includes a scale bar on the?micrograph or drawing then follow these steps:Worked Example
Calculate the magnification of the transverse section of the leaf blade.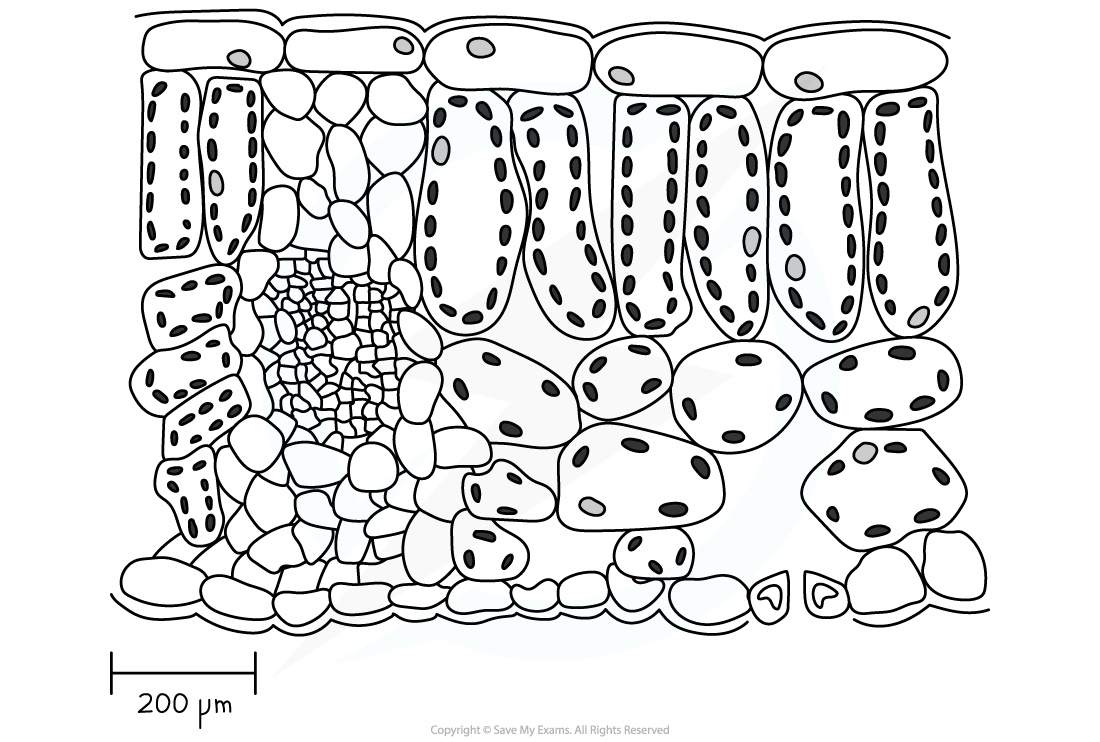
Transverse section of the leaf blade
Step 1: Use a ruler to measure the length of the scale bar in millimetres
Using a ruler the length of the scale bar is equal to 20 mm
Step 2:?Convert this measurement into the same units as the number on the scale bar
The units on the scale bar are μm, remember that 1mm = 1000 μm
therefore 20 mm = 20 x 1000 = 20 000 μm
Step 3: Insert these numbers into the magnification formula?
 Note: the size of the image is the measured length of the scale bar and the actual size is the number on the scale bar
 therefore Magnification = x 100
Exam Tip
Before doing any calculations make sure that all the measurements have the same units.When doing the calculations it is easier to write the formula, then rearrange it, before you add any measurements, as this helps avoid any possible errors.Note that when you do calculations using a scale bar, the number on the scale bar is informing you how many mm/μm or nm the line actually represents (e.g. if the scale bar has 20 nm above it and the line is 10 mm, then every 10 mm on the diagram is?actually?20 nm).
轉(zhuǎn)載自savemyexams

國(guó)際競(jìng)賽真題資源免費(fèi)領(lǐng)取


美高學(xué)分項(xiàng)目重磅來(lái)襲!立即了解